

Please refer to the e-mail we sent you regarding the e-mail address that was setup by your BazingaWeb geek agent! This e-mail will contain the default password used (which you can of course change – note options below).
General Setup
Open Settings.

Tap Mail.
Tap Accounts.
Note: For older iOS versions, you will instead tap Add Account > Other > Add Mail Account. Then, skip to Step 6.Tap Add Account.
Choose Other.
Enter your account details and tap Next.

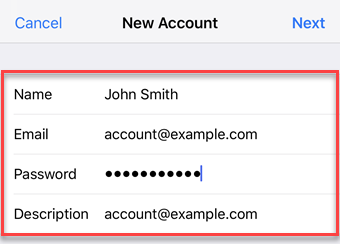
| FIELD | INPUT |
|---|---|
| Name | The name others will see when receiving your mail. |
| The complete email address of your IONOS email account. | |
| Password | The password you entered when setting up the IONOS email address. |
| Description | Enter a description for your account here. This information is only used to better differentiate your account from one another. |
| FIELD | INPUT |
|---|---|
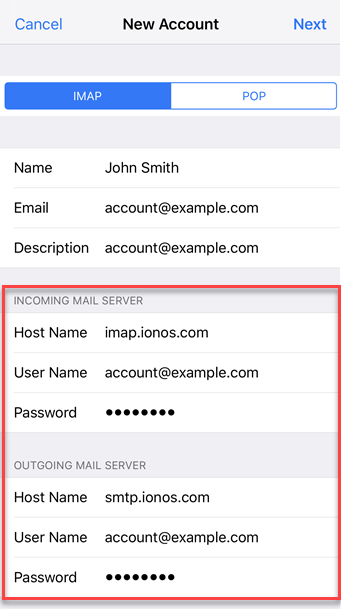
| Hostname | imap.ionos.com (recommended) or pop.ionos.com |
| Username | The full email address of your IONOS email account |
| Password | The password you entered when setting up the IONOS email address |
Although the Outgoing Server Settings are marked as Optional by default, you must enter the Outgoing Server Settings below to properly set up your email account.
If you do not add these settings, you will not be able to send email.
| FIELD | INPUT |
|---|---|
| Hostname | smtp.ionos.com |
| Username | The full email address of your IONOS email account |
| Password | The password you entered when setting up the IONOS email address |
Please Note:
- The email account is automatically set up with SSL encryption. The device performs the correct configuration in the background. You no longer have to set anything manually.
- The SSL settings can also be checked later. For more information, see Enabling SSL encryption on your iPhone/iPod/iPad.

Your email account is now set up. You can now check your mailbox and send emails on your iPhone.

Please refer to the e-mail we sent you regarding the e-mail address that was setup by your BazingaWeb geek agent! This e-mail will contain the default password used (which you can of course change – note options below).
n this article, we will show you how to set up your Mail Basic account on your Android smartphone or tablet.
Please Note
The following steps were created using a device with Android 10. The designations of the individual menu items may vary slightly for devices from other manufacturers.
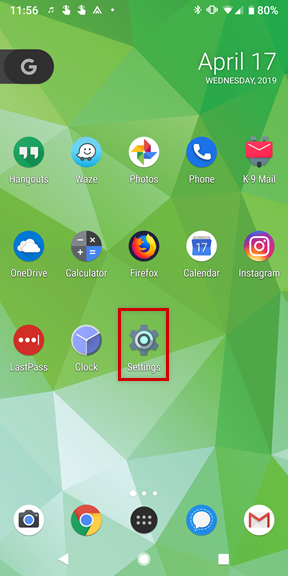
- Tap the Settings icon (typically displayed as a gear).
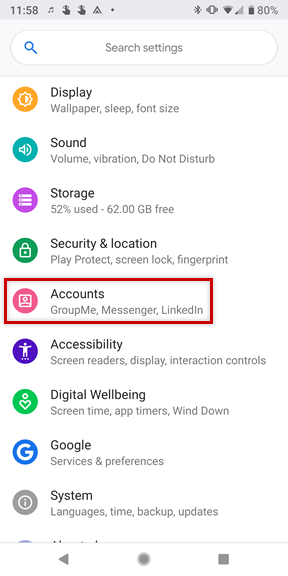
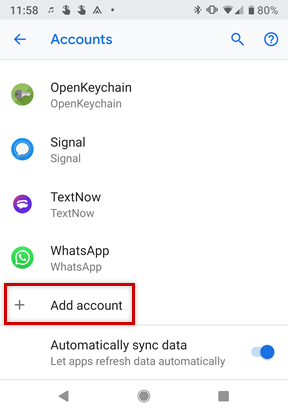
- Go to Accounts.
- Tap Add Account.
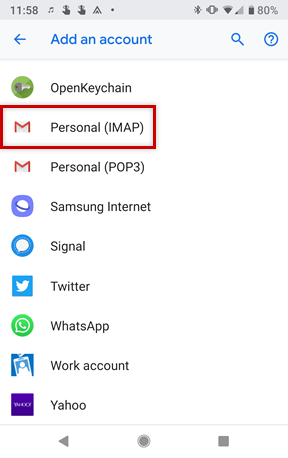
- Select Personal (IMAP).
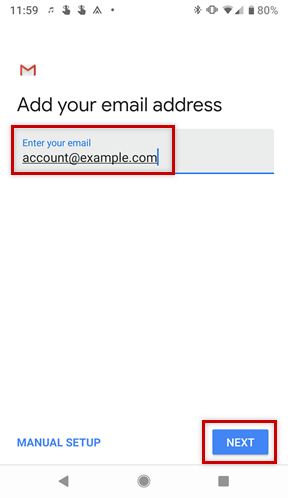
- Enter your email address and tap Next.
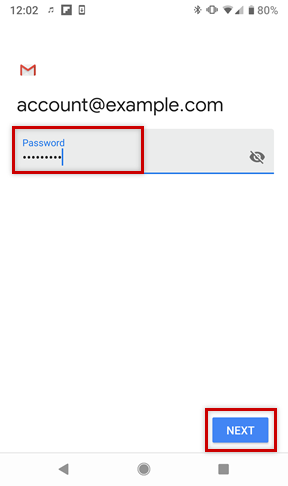
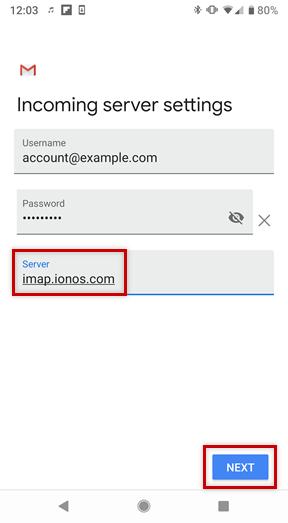
- Enter the password to your email address and tap Next.
- In the Server field, enter imap.ionos.com and tap Next.
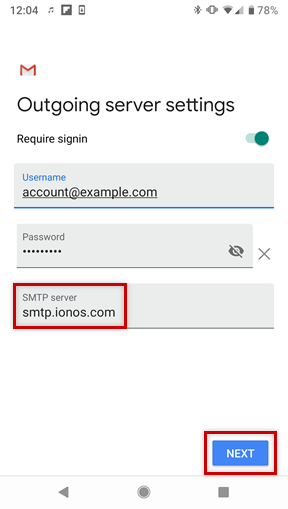
- In the SMTP Server field, enter smtp.ionos.com and tap Next.
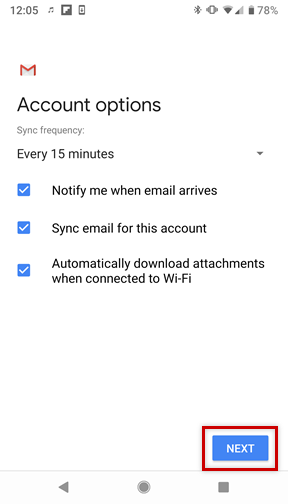
- Choose your desired Account Options and tap Next.
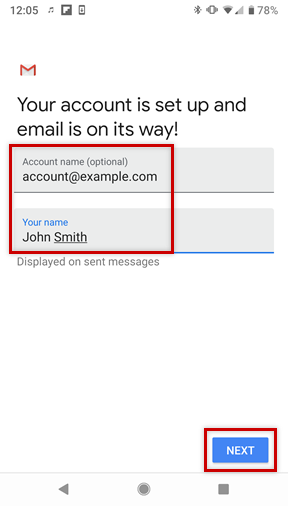
- If you would like, you can change the default Account Name, which helps you differentiate this account from other email accounts on your device, or Your Name, which is displayed on messages you send. Finally, tap Next to complete the setup process.
Please Note
If you choose to perform a manual setup or would like to use a POP3 account instead, you can find the necessary settings below.
| SETTING | FOR IMAP | FOR POP |
|---|---|---|
| Server | imap.ionos.com | pop.ionos.com |
| Security type | SSL | SSL |
| Port | 993 | 995 |
| SETTING | YOUR INPUT |
|---|---|
| SMTP server | smtp.ionos.com |
| Security Type | TLS (Accept all certificates) |
| Port | 587 |
| Login Requires Checkbox | |
| Username | The full email address of your IONOS email account. |
| Password | The password you entered when setting up the IONOS email address. |
Your Mail Basic account has been successfully added to your Android device and should be ready to use immediately.
Open Microsoft Outlook 2019.
Click File > Information > + Add Account and the Welcome to Outlook window will appear.
Enter the email address.
Click on Advanced Options.
Enable the Let me set up my account manually option.
Click Connect. The Select Account Type window opens.
If you want to check your email using IMAP (Recommended), select the IMAP account type. If you want to check your email using POP3, select the POP account type.

In the Incoming Email section, in the Server field, enter the corresponding incoming mail server (See below).
| SERVER INFORMATION FOR IMAP ACCOUNTS | |
|---|---|
| Account type | IMAP |
| Incoming mail server | imap.ionos.com |
| Outgoing mail server | smtp.ionos.com |
| SERVER INFORMATION FOR POP3 ACCOUNTS | |
|---|---|
| Account type | POP3 |
| Incoming mail server | pop.ionos.com |
| Outgoing mail server | smtp.ionos.com |
If you are setting up an IMAP account, enter 993 in the Port (IMAP) field within the Incoming email section and select SSL in the Encryption method list.
If you are setting up a POP3 account, enter 995 in the Port field within the Incoming emailsection and select SSL in the Encryption method list.In the Outgoing email section, in the Server field, enter the outgoing mail server smtp.ionos.comand select TLS in the Encryption method list.
In the Outgoing email section, in the Port field, enter port 587.
Please Note: If you encounter the error “Outlook could not connect to your outgoing mail server“, you can alternatively use port 465.Click on Next.
Enter the password.
Please Note
If your password is not accepted, you can simply set a new password for your email address. For more information about how to do this, please see the article Changing your email password.
Click Connect. The account settings you've entered will now be tested.
- Open Microsoft Outlook 2016 and click File in the menu.
- Under Account Information, click + Add Account.
- Select Manual setup or additional server types and click Next.
- Select POP or IMAP and click Next.
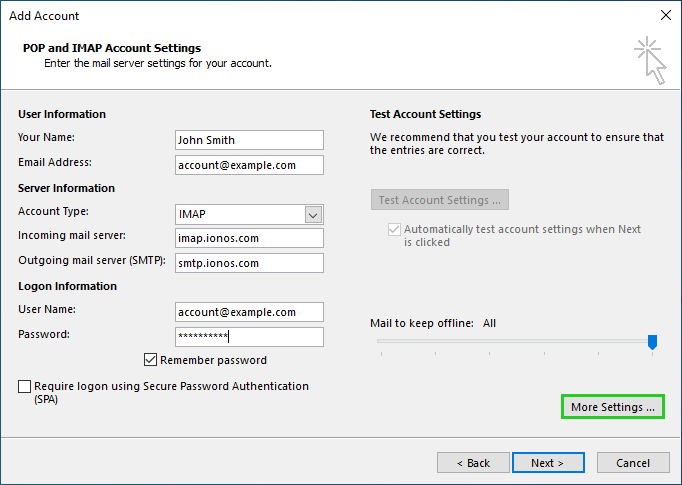
- Enter the user,server and logon information. Select the account type: IMAP or POP3.
If you want to retrieve your email using POP3, select Account type POP3 in the Server information. Enter pop.ionos.com as your incoming mail server. The other account settings are the same as for IMAP.
| USER INFORMATION | |
|---|---|
| Your Name | The name you want displayed on outgoing emails |
| Email Address | The complete email address that you are setting up |
| SERVER INFORMATION | |
|---|---|
| Account type | IMAP |
| Incoming mail server | imap.ionos.com |
| Outgoing mail server | smtp.ionos.com |
| LOGIN INFORMATION | |
|---|---|
| User Name | The full email address of your IONOS email account |
| Password | The password you entered when you set up the email address |
| Require login using Secure Password Authentication (SPA) | As this function is not supported by our mail servers, please do not tick this box. |
Click More settings…
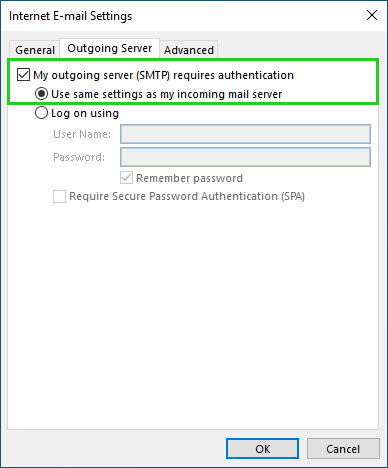
Under the Outgoing mail server tab, check the box My outgoing server (SMTP) requires authentication. Select the menu item Use same settings as my incoming mail server.
Now switch to the Advanced tab. Insert the data below for the incoming and outgoing mail servers.
| SERVER PORT NUMBERS | ||
|---|---|---|
| Incoming Server (IMAP) | 993 | Select the connection type SSL in the drop-down menu |
| Outgoing Mail Server (SMTP) | 587 | Select the connection type Automatic in the drop-down menu |
SSL Settings for POP: Now switch to the Advanced tab. Check the box Server requires an encrypted connection (SSL). Then input the incoming and outgoing mail server settings.
| SERVER PORT NUMBER | ||
|---|---|---|
| Incoming mail server (POP3) | 995 | Check Server requires an encrypted connection (SSL) |
| Outgoing Mail Server (SMTP) | 587 | Select the connection type Automatic in the drop-down menu |
Click Ok.
Back at the POP and IMAP Accounts Settings screen, click Next, and then Finish.
Initial Setup of an Email Account
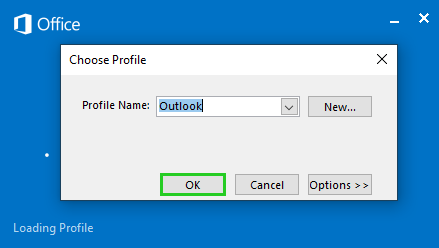
When you open Microsoft Outlook 2013 for the first time, the Select Profile window appears. Confirm the automatically set up profile with OK.
The Welcome to Outlook 2013 window will then appear. Click Next, and the Add email account window appears.
Make sure the answer to the following question is yes: Do you want to set up Outlook to connect to an email account?
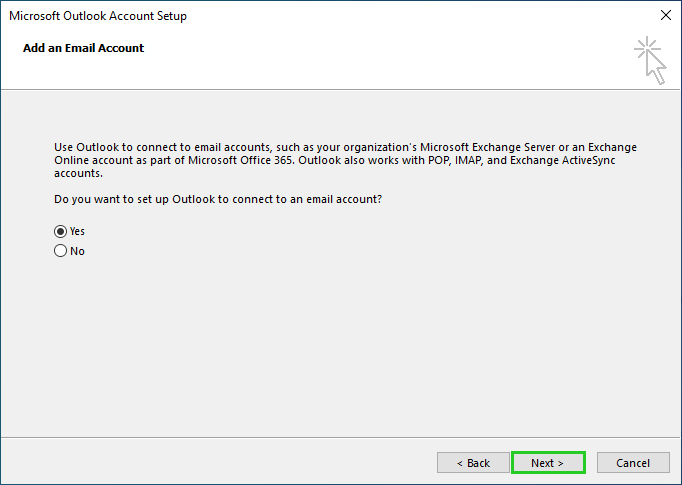
Click Next.
Enable the option Manual configuration or additional server types.
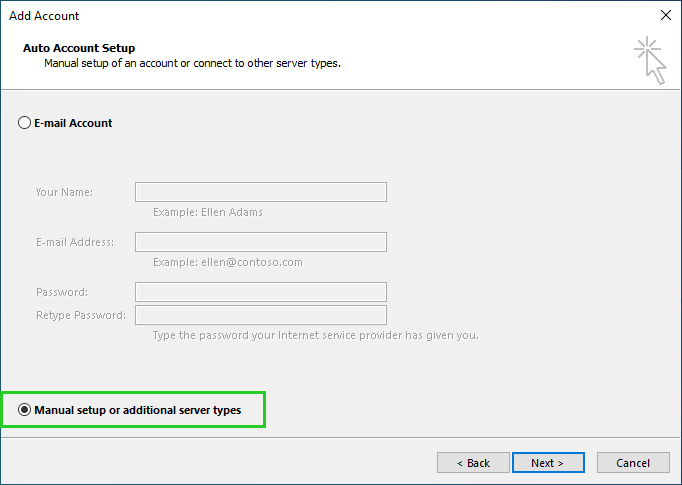
Click Next.
Select IMAP or POP. IMAP is recommended.
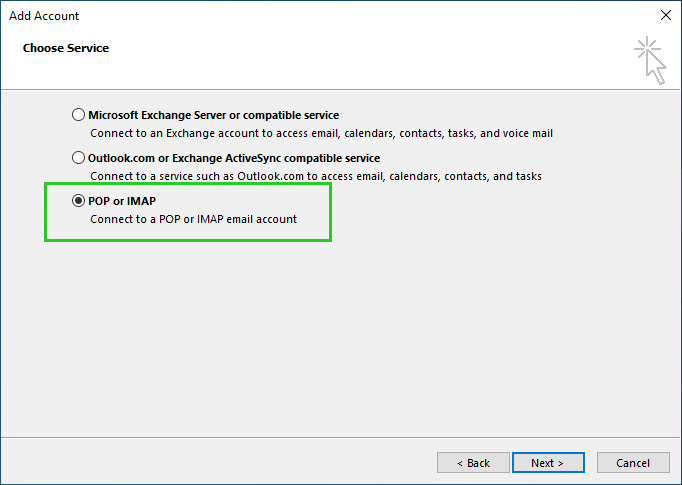
Click on Next.
In the Your Name field, type your name.
In the Email address field, enter your email address.
If you want to use IMAP to retrieve your email, select IMAP in the Account type field. If you want to retrieve your email using POP3, select POP3 in the Account type box.
In the Incoming server and Outgoing server (SMTP) fields, enter the appropriate servers (See below).
| SERVER INFORMATION FOR IMAP ACCOUNTS | |
|---|---|
| Account type | IMAP |
| incoming mail server | imap.ionos.com |
| outgoing mail server | smtp.ionos.com |
| SERVER INFORMATION FOR POP3 ACCOUNTS | |
|---|---|
| Account type | POP3 |
| incoming mail server | pop.ionos.com |
| outgoing mail server | smtp.ionos.com |
Enter your email address in the Username field.
In the Password field, enter the password of your email account. You have assigned this password yourself when setting up the email address in the Control Panel.
Note
If the password is not accepted, set a new password for your email address. For more information, see the article Changing your email password.
Click on More settings.
On the Outgoing Mail Server tab, select the The outgoing mail server (SMTP) requires authentication check box. Then, select the option Use same settings as for incoming mail servers.
Switch to the Advanced tab.
If you are setting up an IMAP account, select SSL in the Use the following encrypted connection type list and type port 993 in the Incoming mail server (IMAP) field.
If you are setting up a POP3 account, select SSL in the Use the following encrypted connection type list and type port 995 in the Incoming mail server (POP3) field.In the Outgoing mail server (SMTP) field, select TLS in the Use the following encrypted connection type list and type port 587.
Click OK.
To test the account settings, click Next.
Troubleshooting
If no messages are received or sent, check the account settings.
Check the firewall you use to make sure that the required ports are open.
Check the settings of the antivirus program you are using.
Step 1
Open Microsoft Outlook 2010.
Step 2
Click on File and select the Add account button under the Information menu item.
Step 3
Select that you want to create a new account and check the box to manually configure server settings or additional server types.
Step 4
Click on Internet email and then on Next.
Step 5
Enter the user, server and logon information.
Select the account type: POP3 or IMAP (Recommended). Why is this choice particularly important? If you want to read and receive emails on more than one device, set up the IMAP account type. If you only manage your emails on one device, POP3 may work for you. However, POP3 by default downloads messages to your device and deletes them from the server, which can make email recovery difficult (if possible at all) if messages are accidentally deleted or something happens to that device.
To send emails from this new account, click More settings.
| USER INFORMATION | |
|---|---|
| You can choose your name. | |
| Email Address | The full email address you want to set up in Outlook 2016. |
| SERVER INFORMATION | |
|---|---|
| Account type | IMAP |
| Incoming mail server | imap.ionos.com |
| Outgoing mail server | smtp.ionos.com |
| CREDENTIALS | |
|---|---|
| Username | Your email account details |
| Password | The password that you assigned when setting up the email address in IONOS yourself. |
| Logon using Secure Password Authentication (SPA) required. Since this feature is not supported by our mail servers, please do not check this box. |
Please note: If you want to retrieve your emails via POP, select POP as account type and enter pop.ionos.com as incoming mail server.
Step 6
Under Outgoing mail server, select Outgoing mail server (SMTP) requires authentication. Select the menu item Use the same settings as for incoming mail servers.
Step 7
SSL settings for IMAP:
Switch to the Advanced tab. Select the data for the incoming and outgoing mail servers.
| SERVER CONNECTION NUMBER | ||
|---|---|---|
| Incoming Mail Server (IMAP) | 993 | SSL |
| Outgoing Mail Server (SMTP) | 587 | Automatic |
SSL for POP settings:
Switch to the Advanced tab. Enter the data as follows:
| SERVER CONNECTION NUMBER | ||
|---|---|---|
| Incoming mail server (POP3) | 995 | Server requires an encrypted connection (SSL) |
| Outgoing Mail Server (SMTP) | 587 | TLS |
Complete the process with OK.
Please note: Port 587 and the Automatic setting do not work? Instead, enter port 465 for outgoing mail server (SMTP) and select the connection type SSL.
Step 8
Complete the process with Next > Finish.
Your email account is now ready.
- Open Microsoft Outlook 2007.
- Click Tools > Account Settings... in the top menu bar.
- In the following window click on the New button.
- Select Microsoft Exchange, POP3, IMAP or HTTP and click Next.
- Check Configure server settings or additional server types manually and click Next.
- In the next window, select Internet E-mail and click Next.
- Enter user, server and logon information.
To allow emails to be sent from this new account, click More settings.
| USER INFORMATION | |
|---|---|
| You can choose your name. | |
| Email Address | The full email address you want to set up in Outlook 2016. |
| SERVER INFORMATION | |
|---|---|
| Account type | IMAP |
| Incoming mail server | imap.ionos.com |
| Outgoing mail server | smtp.ionos.com |
| CREDENTIALS | |
|---|---|
| Username | Your email account details |
| Password | The password that you assigned when setting up the email address in IONOS yourself. |
| Logon using Secure Password Authentication (SPA) required. Since this feature is not supported by our mail servers, please do not check this box. |
- Click Outgoing Mail Server.
- Check The outgoing mail server (SMTP) requires authentication.
- Select the menu item Use the same settings as for incoming mail servers.
- Now switch to the Advanced tab. Enter the data for the incoming and outgoing mail servers.
| SERVER CONNECTION NUMBER | ||
|---|---|---|
| Incoming Mail Server (IMAP) | 993 | SSL |
| Outgoing Mail Server (SMTP) | 587 | Automatic |
Please Note
Are you having trouble using Port 587 and the Automatic setting? Instead, enter port 465 for outgoing mail server (SMTP) and select the connection type SSL.
- The previous window appears. Click Next > Finish.
Please refer to the e-mail we sent you regarding the e-mail address that was setup by your BazingaWeb geek agent! This e-mail will contain the default password used (which you can of course change – note options below).
Guided Steps
- Log in to Webmail.
- In the main navigation bar, click on the gear icon in the top-right corner.

- Click on Change password in the left-hand navigation.
- Now enter your old password, then your new password. Finally, click Change Password.
Your password will now be changed. This may take a moment to take effect.
If you are using an on your computer – such as Microsoft Outlook – or if you also check your emails with a mobile device, change the password stored in the account settings.
Note: When your new messages are forwarded, messages from spam won't be included.
Turn on automatic forwarding
- On your computer, open Gmail using the account you want to forward messages from. You can only forward messages for a single Gmail address, and not an email group or alias.
- In the top right, click Settings See all settings.
- Click the Forwarding and POP/IMAP tab.
- In the “Forwarding” section, click Add a forwarding address.
- Enter the email address you want to forward messages to.
- Click Next Proceed OK.
- A verification message will be sent to that address. Click the verification link in that message.
- Go back to the settings page for the Gmail account you want to forward messages from, and refresh your browser.
- Click the Forwarding and POP/IMAP tab.
- In the “Forwarding” section, select Forward a copy of incoming mail to.
- Choose what you want to happen with the Gmail copy of your emails. We recommend Keep Gmail's copy in the Inbox.
- At the bottom of the page, click Save Changes.
Send a copy of every email you receive to another email address; this is known as carbon copying.
Note: Copying your emails stores them in both email addresses, which counts toward your email account's maximum storage capacity. To avoid storing the emails, you can set up a forwarding address.
- Log in to your Workspace Control Center. (Need help logging in?)
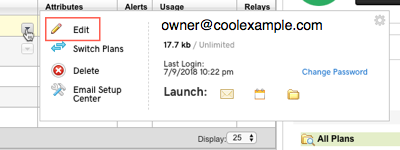
- Click the Expand icon in the row of the email address you want to change.
- Click Edit.
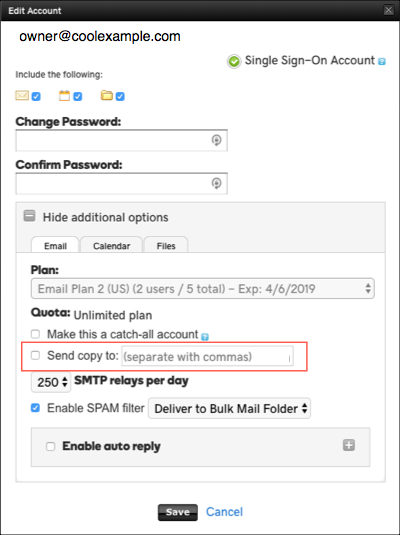
- Confirm that the Email tab is selected.
- Select Send copy to:, and enter the addresses that will recieve the forwarded copies.
Note: You can enter multiple addresses, separate each address by a comma.
- Click Save.
In Mail on iCloud.com, click
at the top of the Mailboxes list, then choose Preferences.In the General tab, select “Forward my email to,” then type the forwarding address in the text field.
If you don’t want to store a copy of each forwarded message in iCloud, select “Delete messages after forwarding.”
Keep in mind that storing copies of forwarded messages decreases your available iCloud storage space.
Click Done.
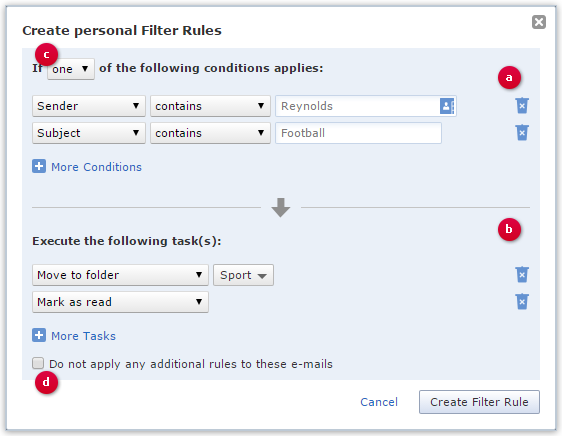
f our suggested quick filter rules does not suit your needs, you can add custom filter rules. Custom filter rules can be more complex.
If none of the suggested quick filters are suitable, you can also create a custom filter. When doing so, you can choose which conditions (a) trigger which tasks (b). You can also create combinations. You can choose whether one or all of the conditions must be met using the list field (c).
When you save (“Create Filter Rule”), the system checks whether your filter rule makes sense and whether it may lead to an unwanted loss of data.
Testing a filter rule before saving
If you are unsure whether the filter rule is working as planned, you can test it first: do not delete the affected e-mail; instead, move them to a folder. If no misdirected mail arrives in this folder after a test period, you can use the filter rule as planned.
Select the Settings gear icon in the Outlook on the web toolbar.
:max_bytes(150000):strip_icc():format(webp)/Capture-5c8f34ecc9e77c0001a926a6.JPG)
Select View all Outlook settings.
:max_bytes(150000):strip_icc():format(webp)/Capture-5c8f351dc9e77c0001eb1c50.JPG)
In the Settings dialog box, select Mail > Forwarding.
:max_bytes(150000):strip_icc():format(webp)/Capture-5c8f35f746e0fb000172f061.JPG)
Select the Enable forwarding check box.
:max_bytes(150000):strip_icc():format(webp)/Capture-5c8f362946e0fb00017700c2.JPG)
Clear the Enable forwarding check box to prevent Outlook on the web from forwarding any more messages.
Enter the email address that will receive the forwarded email messages.
:max_bytes(150000):strip_icc():format(webp)/Capture-0bdf363576a046059dea4ba304edee6d.JPG)
If you want to keep copies of the forwarded messages in your Outlook account, select the Keep a copy of forwarded messages check box.
If Keep a copy of forwarded messages is not checked, forwarded mail will not be available in your Outlook account (not even in the Deleted folder).
:max_bytes(150000):strip_icc():format(webp)/Capture-e34dcf23033f458fb0a419851472ddf8.JPG)
Select Save.
- Click Settings | click More Settings .
- Click Mailboxes.
- Click the primary mailbox account.
- Under Forwarding, enter the Forwarding Address.
- Click Verify.
- Log in to your forwarding address and follow the instructions sent there.
For all other e-mail providers, please reach out to your designated BazingaWeb Geek and they will be able to help you.